We earn a commission when you buy through our Amazon links, at no extra cost to you. It never changes the order of the picks, and we say so when the cheaper thing is the better buy. How this works.
The short version: soak the stone, set the blade at about 20 degrees, and push along one side until you can feel a burr along the entire edge. Repeat on the other side. Move to a finer grit and repeat. Remove the burr with light alternating strokes. Strop. That is the whole thing.
The only genuinely difficult part is holding the same angle every stroke. Everything that makes sharpening feel mysterious traces back to that one problem, which is also why guided systems exist and why people who use them get good edges immediately.
#ad · Live prices from the Amazon Creators API, as of October 19, 2026. Where we have no verified live price we show none — a gap beats a number that has rotted.
In detail
The picks, in full
01
Best whetstone
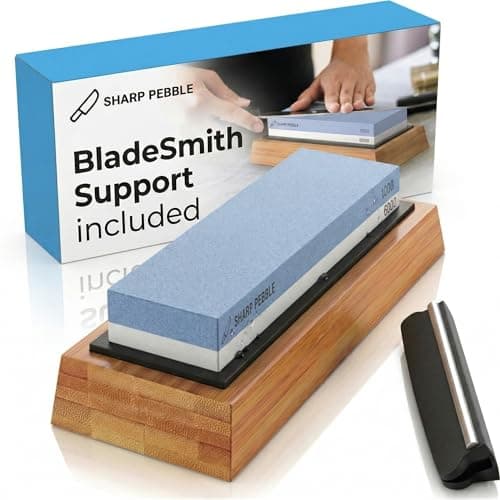
Sharp Pebble 1000/6000 Whetstone
1000 grit6000 gritBamboo baseAngle guide included
7.0/10
The traditional answer, the cheapest per edge, and the one that will still work in twenty years.
Edge consistency
6
Speed
5
Versatility
10
Learning curve
4
Value
10
What's good
+1000 grit reprofiles, 6000 finishes — the two-grit combination covers nearly all sharpening
+No moving parts to break and nothing proprietary to replace
+Works on every steel including the powder metallurgy grades
What's not
−Requires you to hold the angle yourself, which is a real skill with a real learning curve
−Needs soaking and produces a mess
−Stone dishes over time and needs flattening
Skip it if…
…you want it done in ninety seconds. Freehand sharpening is a practice, not a purchase.
Prepare the stone. Water stones soak for five to ten minutes until they stop bubbling. Oil stones get a light film of honing oil. Diamond plates need neither, though a little water helps clear swarf. Put the stone on a damp cloth so it cannot slide.
Set the angle. Twenty degrees per side suits most Western folders and matches the majority of factory grinds. If you need a reference, a stack of two US quarters under the spine of a typical folder is close to 20 degrees; an angle guide costs a few dollars and removes the guesswork entirely.
Grind one side until you raise a burr. Push the edge across the stone as though you were slicing a thin layer off it, keeping that angle constant. Work the whole length including the belly and the tip. Every thirty seconds, run a thumb across the edge from spine to edge — never along it. When you feel a tiny wire of steel folded over onto the opposite side along the entire length, that side is done.
Repeat on the other side. Same angle, same process, until the burr flips back the other way along the full length.
Move to a finer grit. A 1000-grit stone does the sharpening; a 6000 grit refines it. Repeat the burr process on both sides with lighter pressure.
Remove the burr. Very light alternating strokes, one side then the other, progressively lighter. The burr is weak steel — if you leave it, the knife feels sharp for about ten cuts and then does not.
Strop. Ten to twenty passes per side on leather, spine-first, aligns the edge and polishes off any remaining burr.
Test honestly. Hold a sheet of paper loosely by one corner and slice down through it. A properly sharpened knife glides; a knife with a burr still on it catches and tears.
The four mistakes that account for nearly every bad result
Changing the angle mid-stroke
Usually caused by rolling your wrist as the blade travels. Lock your wrist and move from the shoulder. This is the entire skill.
Never raising a burr
If you have not raised a burr, the two bevels have not met and there is no apex — you are polishing a rounded edge. This is the most common reason a knife comes off the stone no sharper than it went on.
Too much pressure
Pressure removes steel faster and controls the angle worse. Let the abrasive cut. On the finishing grit the blade's own weight is close to enough.
Neglecting the belly and the tip
The curved section near the tip needs the handle raised progressively through the stroke to keep the same angle on the changing curve. Skip it and you get a knife that is sharp in the middle and blunt where you actually cut.
How often
Sharpen when the knife stops slicing paper cleanly. Strop between sharpenings — thirty seconds of stropping roughly doubles the interval and is the highest-return habit in the whole category.
How these were picked
I haven't handled these. Here's what I did instead.
Everyone in this category says they tested twenty of these. I haven't tested any, and I say so. What I do instead: read the manufacturer's manual and published specification, compile the numbers that decide the purchase, do the arithmetic in the open, check the live price, and name one product to skip. The scores above are judgments from that research against a published rubric — they are not measurements I took, because I do not have a lab and I am not going to pretend otherwise.
Questions
Frequently asked
What grit whetstone should I start with?+
A 1000/6000 combination stone covers everything short of genuine damage: 1000 does the sharpening, 6000 refines. Avoid 400/1000 sets sold as beginner kits — they give you two coarse stages and no finishing stage.
How do I know when I have raised a burr?+
Run a thumb gently across the edge from spine to edge — never along it. A burr feels like a tiny wire or a rough lip folded over onto the far side. When you can feel it along the entire length, that side is finished.
Can I sharpen a serrated blade?+
Only with a tapered ceramic or diamond rod, worked in each individual scallop from the front side, and then the burr removed with a flat pass on the back. A flat stone will simply grind the serrations off.
Push or pull across the stone?+
Either works. Edge-leading — pushing as though slicing a layer off the stone — tends to produce a cleaner apex with less burr to remove. Consistency of angle matters far more than direction.
Do I need to soak a diamond plate?+
No. Diamond plates work dry, though a little water helps flush away the metal swarf and keeps the surface cutting. Never soak a diamond plate the way you would a water stone.
We do not run a testing lab and we do not pretend to. Where a measured number came from a manufacturer's published specification or someone else's lab, we name them and link them. Where we could not verify something, we say so on the page rather than quietly leaving it out. Read the full method.